
Yes. You can edit video with Codex on a Mac (macOS 13+) or Windows PC (Windows 10+ x64) by connecting OpenAI’s Codex agent to ChatCut Desktop, turning plain-English prompts in your terminal or desktop app into cuts, captions, titles, B-roll, and music on an editable multi-track timeline. This ChatCut Desktop workflow does not support Linux. We make ChatCut, the AI video editor used in this walkthrough.
About this walkthrough: This walkthrough records one actual batch-editing project run in Codex CLI through ChatCut Desktop. Steps 2–8 reproduce its seven recorded editing requests as text; the images are real Desktop captures or export frames, not screenshots of a Codex conversation. Other copyable prompts are suggested variations. Timings and ChatCut charges describe this project only; Codex costs were not measured.
If you only need to polish one recording inside the ChatGPT desktop app, read our single-video guide on how to edit video with ChatGPT. This tutorial covers the Codex video editing workflow for batch-editing an entire local folder of clips at once. On November 18, 2026, we pointed Codex CLI (0.169.0-alpha.11.1, running gpt-6-astra at high reasoning effort) at a folder of three 40-second horizontal talking-head takes (120.05 seconds total). Across seven prompts and about 13.5 minutes, Codex imported and transcribed all three files together, cut fillers and dead air onto three separate 9:16 timelines in one project, reused one word-level caption template, one 2-second title card template, and one auto-ducked music track across the batch, quoted and generated one 4-second B-roll clip for 2.88 ChatCut credits, and exported three 1080×1920 MP4s. Subsequent command-line stream checks, full decoding, and sampled-frame review are outside that 13.5-minute interval. The run did not benchmark other agents.
Can Codex edit videos, and how does Codex video editing work?
In OpenAI’s current ChatGPT desktop app and Codex CLI, Codex is an agent built to inspect local folders, run commands, and call connected Model Context Protocol (MCP) servers. On its own, Codex has no video timeline. Creators who search can Codex edit videos usually run into three very different setups:
| Setup | What Codex actually does | What you get back | Where it breaks down |
|---|---|---|---|
| Codex alone (no video tools) | Reads an .srt or transcript and suggests timestamps or shell commands | Edit notes or shell scripts | A transcript alone does not provide a visual editing workspace; previews and rendered effects require additional tools |
| Codex + code renderers (Remotion or HyperFrames) | Writes React or HTML animation code and renders a video file | A flat .mp4 plus source code | The editable source is a code project; available preview and editing controls depend on the renderer |
| Codex + ChatCut Desktop | Imports local files, edits transcripts, builds timelines, applies reusable caption/title templates, and exports | Editable multi-track timelines inside ChatCut Desktop plus finished MP4 or XML handoff files | Requires macOS 13+ or Windows 10+ (x64) and an internet connection (Product Facts) |
Connecting ChatCut for Codex gives you both halves of the job: Codex handles the repetitive folder-level work—passing file arrays, reusing one caption and title component across multiple timelines, and checking rendered outputs with command-line tools—while ChatCut Desktop keeps every cut, caption, overlay, and audio track open for manual inspection.
Where Codex runs, which model it uses, and how billing splits
- Three local ways to run Codex with ChatCut. You can run prompts in
codexin your terminal (used for folder paths and post-exportffprobechecks in this run), select Codex inside the ChatGPT desktop app, or choose Codex CLI under Agent Selection at the bottom of ChatCut Desktop’s AI panel so the chat sits beside the Viewer and Timeline. OpenAI documents shared MCP settings for its desktop app, CLI, and IDE extension in~/.codex/config.toml(OpenAI MCP docs). Existing cloud projects inapp.chatcut.iouse the separate hosted Web plugin instead. - Your own OpenAI model and subscription. Codex model access depends on your account and sign-in method—our November 18 run used
gpt-6-astraathighreasoning effort in Codex CLI, and OpenAI’s Codex models guide also documentsgpt-6.2-astraandgpt-6.2-solacross the app and CLI. Check the plan and surface before starting: OpenAI currently lists Free access in the desktop app subject to rollout, and CLI access on eligible plans or with an API key (OpenAI Codex pricing). - Separate OpenAI and ChatCut billing. When Codex drives ChatCut Desktop, Codex’s reasoning uses its own subscription allowance or API billing rather than ChatCut’s built-in Agent meter (Credits policy). Importing local clips, speech transcription, timeline cuts, captions, agent-authored titles, stock CC0 audio, and local MP4 exports cost 0 ChatCut credits and export without a watermark on ChatCut’s Free plan. Cloud exports include a free allowance; beyond it they follow ChatCut’s current credit rules (see Web vs Desktop Export). ChatCut asks for confirmation before any paid cloud export. You also spend ChatCut credits when you approve ChatCut-hosted AI media generation; AI video and ChatCut image generation require a paid plan starting at $25/month for 100 credits.
What did our 3-clip Codex batch edit produce?
Below is Short B (26.8 seconds, 1080×1920, 30 fps), one of the three vertical MP4s exported at the end of our seven-prompt Codex CLI session, re-encoded from the 40.80 MB master to 5.19 MB (4.95 MiB) for web playback. Both files contain 805 video frames at 30 fps; compression changes image data:
Watch what happens across those 26.8 seconds—and how the same packaging rules carried across all three clips in the folder:
- 0:00 to 0:02: A shared 2-second black opening card (
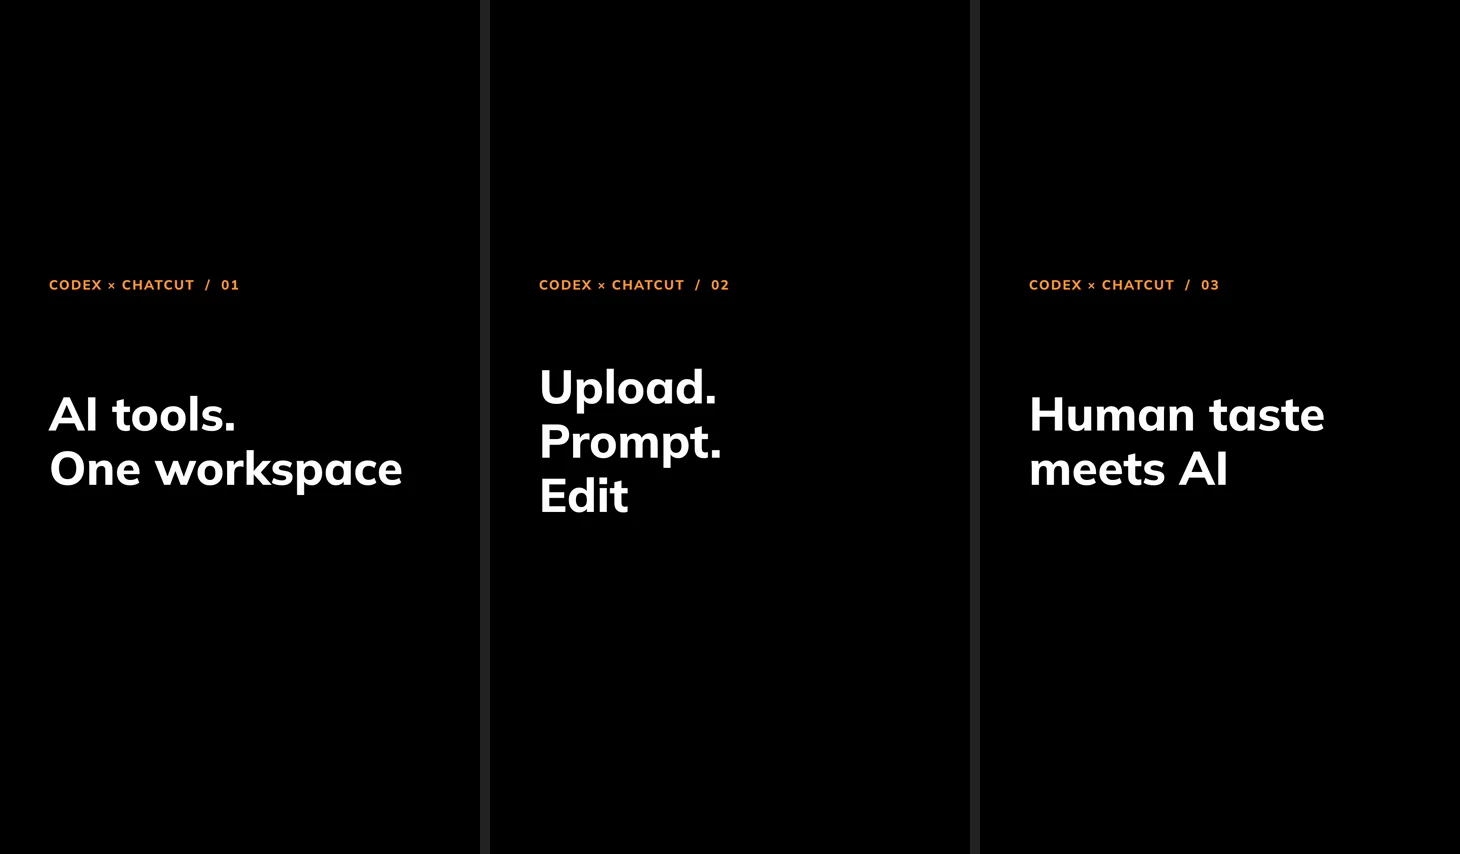
CODEX × CHATCUT / 02above “Upload. Prompt. Edit”), built from the same template as Shorts A and C. - 0:02 to 0:10.9: The horizontal 1920×1080 source take reframed to 1080×1920 (with horizontal framing shifted so the off-center speaker stays centered) and styled with bold white Mulish captions that highlight only the currently spoken word in orange.
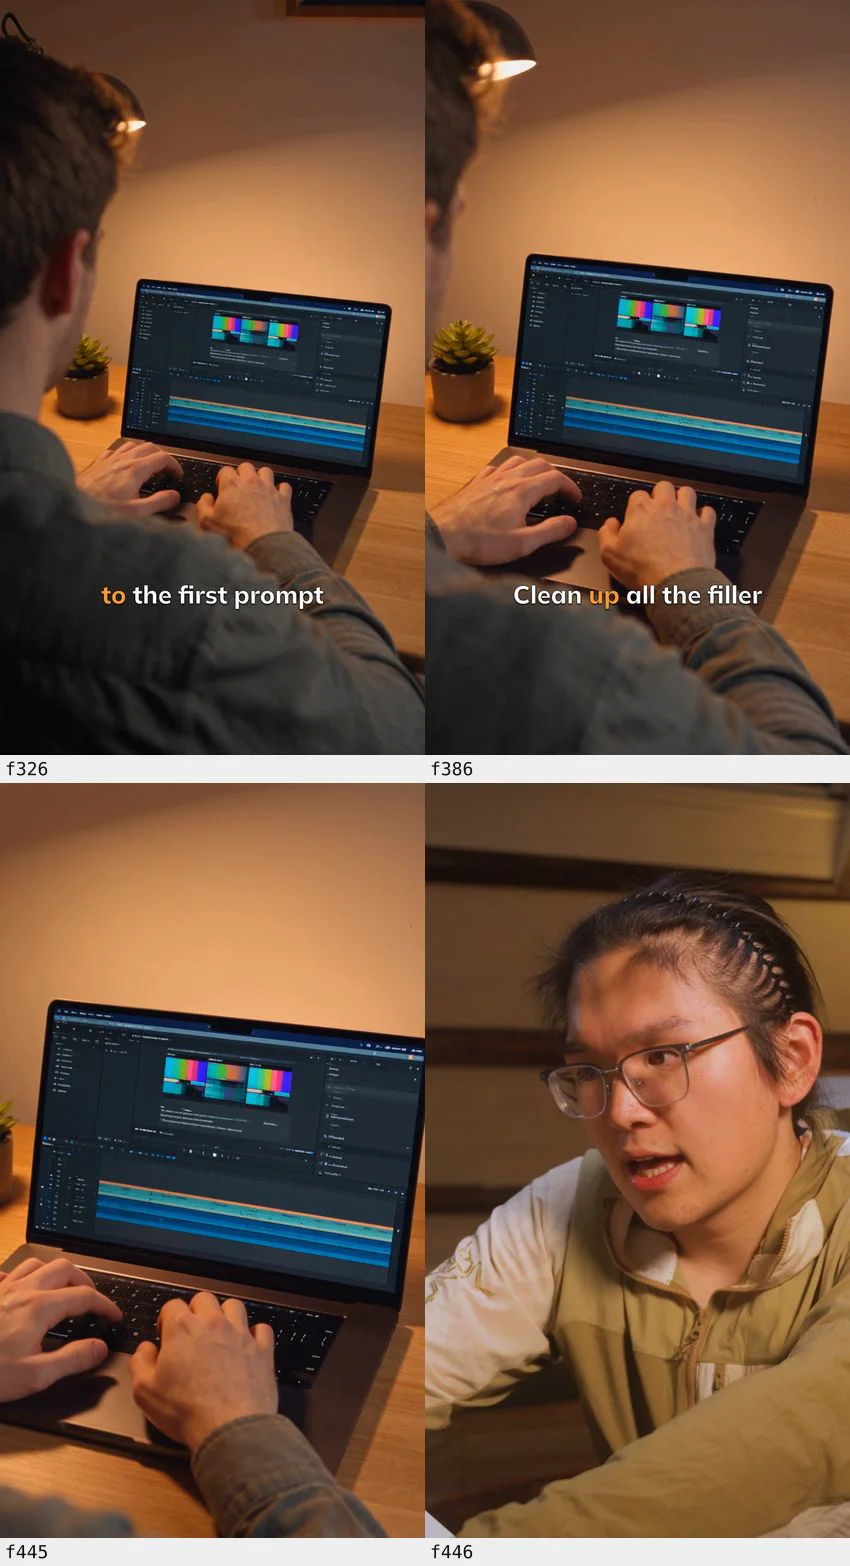
- 0:10.9 to 0:14.9: A 4-second AI B-roll cutaway generated with Seedance 2.5 Flash (2.88 credits, quoted before submission) showing hands typing at a warm-lit laptop workspace while the speaker’s voice and word-level captions continue uninterrupted.
- 0:00 to 0:26.8: One CC0 background music track reused across all three timelines at -6 dB with a 1-second fade-in, 1.5-second fade-out, and automatic voice ducking.
Here is how the complete three-file folder came out:
| Source file | Raw 16:9 length | Trimmed spoken cut | Final 9:16 MP4 (with 2s title) | Opening title card | What Codex cut from the transcript |
|---|---|---|---|---|---|
talk-codex-a.mp4 | 40.04 s | 28.00 s | 30.00 s (44.36 MB) | AI tools. One workspace | ”um”/“uh” fillers, a failed “motion graphics” start, duplicate “All this in” and “Also you can” restarts, and a repeated Premiere/Final Cut phrase |
talk-codex-b.mp4 | 40.00 s | 24.83 s | 26.83 s (40.80 MB) | Upload. Prompt. Edit | ”Finally…” false start and dead air, “uh”, several multi-second pauses, and an unfinished upload explanation at the end |
talk-codex-c.mp4 | 40.01 s | 10.50 s | 12.50 s (19.04 MB) | Human taste meets AI | ”Give me a…”, a failed intro, two long silent waits (8.64 s and 5.93 s), “uh”, and an unfinished third-part intro |
| Folder total | 120.05 s | 63.33 s | 69.33 s | 3 matching cards | About 56.7 s shorter before adding titles |
(These three edits are the direct output of the seven-prompt batch run, without manual post-run word editing. Full decoding and 15 sampled frames checked technical delivery; the run did not include a complete human listening review. Follow the review checklist before publishing.)
How do you batch-edit a folder of clips in Codex in five steps?
- Connect ChatCut Desktop once. Open Codex in the ChatGPT desktop app or
codexin your terminal on macOS 13+ or Windows 10+ (x64), sendRead ChatCut.io/desktop to install ChatCut, sign in to ChatCut Desktop, and start a fresh session so Codex loads ChatCut’s tools. - Import and transcribe the whole folder. Start
codexinside your footage directory and ask it to import every clip into one ChatCut project and run speech transcription across all of them. - Cut and reframe each clip on its own timeline. Have Codex create a dedicated 9:16 timeline per clip (
Short A,Short B,Short C), cut fillers, false starts, and dead air from each transcript, and verify vertical framing on off-center speakers. - Apply shared packaging and selective B-Roll. Reuse one word-level caption style, one 2-second title template, and one auto-ducked music bed across every timeline, and require a credit estimate before generating any paid AI B-roll.
- Batch-export and verify. Render all timelines to local 1080×1920 MP4s, ask for a cut summary table, and spot-check captions, framing, and audio before publishing.
What do you need before you start?
- macOS 13+ (Apple silicon or Intel) or Windows 10+ (x64). ChatCut Desktop runs natively on Mac and Windows; Linux, phones, and
chatgpt.comin a web browser cannot install Desktop. - Codex CLI or the ChatGPT desktop app. Install the ChatGPT desktop app (and choose Codex) or install Codex CLI (
codex) in Terminal or PowerShell. Our recorded run used high reasoning effort; it did not compare effort levels. - A signed-in ChatCut account. Sign in inside ChatCut Desktop so cloud transcription and stock libraries work. Free covers editing, captions, and local exports; add a paid plan ($25/month for 100 credits) only if you want ChatCut-hosted AI video or image generation.
- A clean local folder of source clips. Put the takes you want to batch-process into one readable directory (this run used H.264
.mp4talking-head clips) and set an explicit credit ceiling—such as 5 credits max—before requesting generated B-roll.
Why split a batch edit into A-Roll and B-Roll passes?
Separating A-Roll from B-Roll helps keep the spoken edits and overlays organized across three timelines:
- A-Roll is the spoken spine of each Short: imported camera takes, transcript cleanup, 9:16 subject framing, and word-timed captions (Steps 2 to 4 below).
- B-Roll is the shared packaging and visual support layered around that spine: 2-second title cards, cutaway footage, and ducked background music (Steps 5 to 7 below).
If you ask Codex to trim three transcripts, build title cards, generate B-roll, and duck music in a single prompt, a later change to Clip B’s spoken cut may require reviewing its overlays and audio timing. Review the spoken cuts before adding titles, cutaways, and music.
How do you edit a folder of videos with Codex step by step?
Steps 1 to 4 lock the A-Roll across all three clips. Steps 5 to 8 apply shared B-Roll packaging, export the finished MP4s, and verify the files.
Step 1. Connect Codex to ChatCut Desktop
On a fresh Mac or Windows setup, open a new Codex task (or run codex in your terminal) and send the one-line setup instruction from chatcut.io/desktop (also available on the Codex plugin page):
Codex follows the Desktop installation instructions and runs ChatCut’s official installer (curl -fsSL https://chatcut.io/install.sh | sh on macOS or irm https://chatcut.io/install.ps1 | iex in Windows PowerShell—no Node.js or npm required). ChatCut Desktop launches, opens browser sign-in, registers its local STDIO MCP server in ~/.codex/config.toml, and installs ChatCut’s editing skills into ~/.agents/skills. After signing in, start a new Codex session so the agent loads the newly registered tools. OpenAI’s Plugins documentation also explains starting a new session after installing bundled skills.
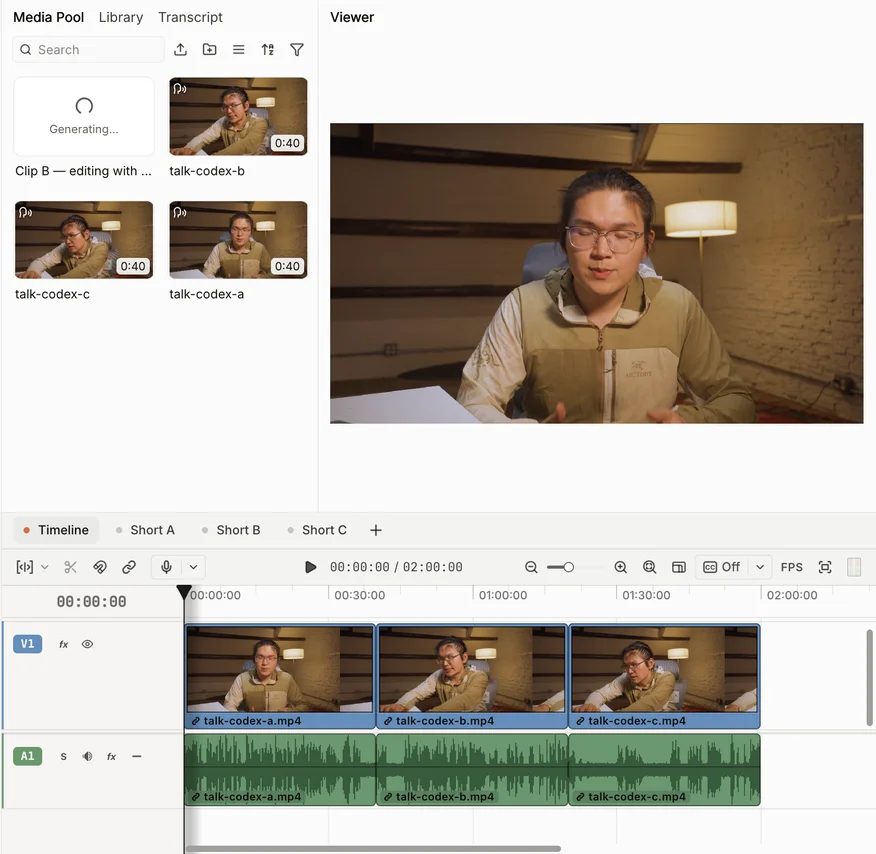
In our November 18 terminal session (codex-cli 0.169.0-alpha.11.1), ChatCut Desktop was already installed and connected on the test Mac, so we did not time a first-time download. Reading the Desktop guide, confirming the live desktop surface, creating a dedicated local project, and checking the account credit balance took about 1 minute and 0 ChatCut credits:
Step 2. Import the whole folder and transcribe every clip at once
With codex pointed at our footage folder—containing talk-codex-a.mp4 (40.04s), talk-codex-b.mp4 (40.00s), and talk-codex-c.mp4 (40.01s), all 1920×1080 at 23.976 fps—we sent our first editing prompt verbatim:
Instead of making you click through a file picker three times, Codex passed all three file paths in a single batch import, triggered word-timed cloud speech transcription on all three assets simultaneously, and placed the three 40-second clips end-to-end on a 120-second reference timeline to inspect the raw picture. Importing, transcribing all three takes, and rendering a three-clip preview sheet took about 1.3 minutes at 0 ChatCut credits.

Step 3. Cut fillers, false starts, and dead air into three 9:16 timelines
Next, we asked Codex to clean up the speech and convert each clip into its own vertical Short:
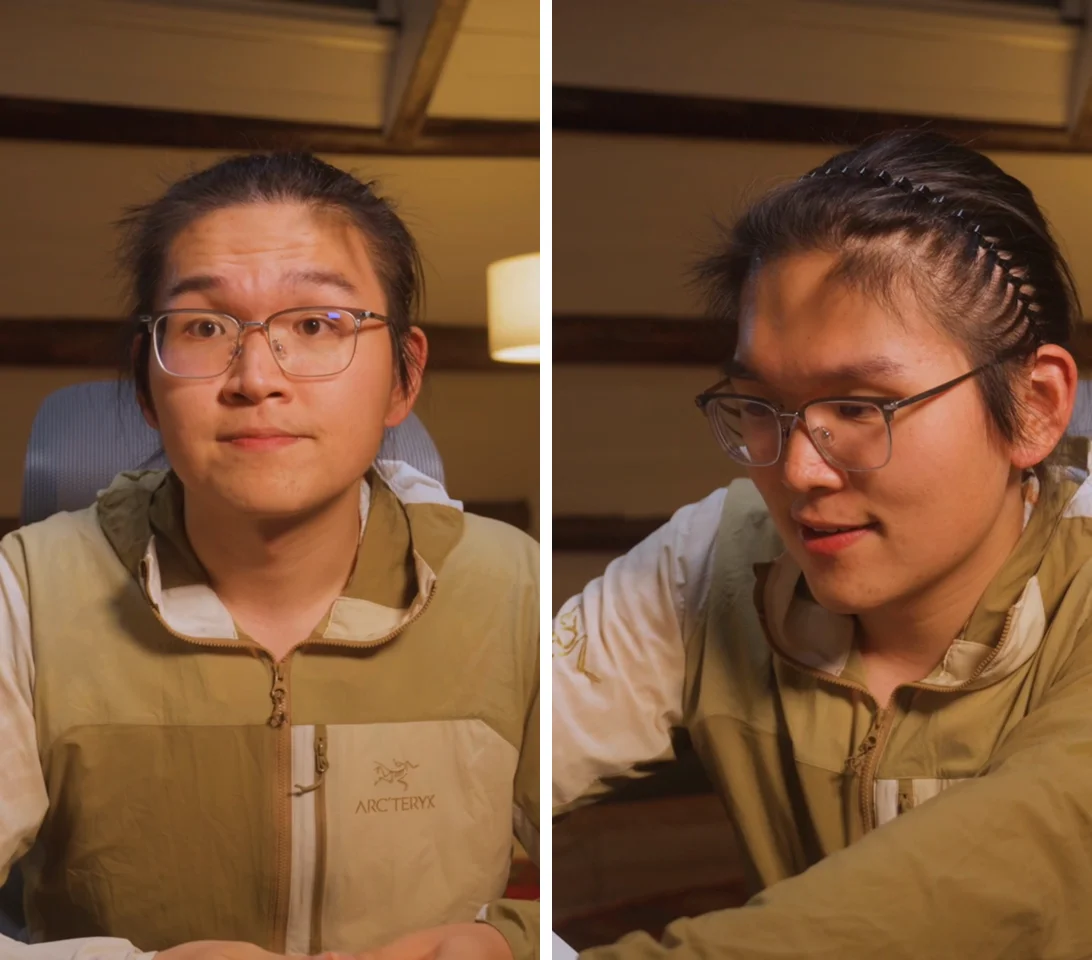
Codex created three separate 1080×1920 (30 fps) timelines—Short A, Short B, and Short C—inside the same project, read the word-timed transcripts alongside visual pause frames from the source footage, and trimmed each take independently (about 2.5 minutes, 0 ChatCut credits):
Short A(40.04s → 28.00s): Removed “um” and “uh” fillers, an aborted “motion graphics” sentence start, duplicate “All this in” and “Also you can” restarts, and a repeated Premiere/Final Cut phrase.Short B(40.00s → 24.83s): Cut a “Finally…” false start and its silent wait, dropped “uh”, tightened several multi-second pauses, and removed an incomplete upload line at the tail.Short C(40.01s → 10.50s): Cut “Give me a…” and a failed intro, removed two long stretches of silent waiting (8.64 seconds and 5.93 seconds), dropped “uh”, and trimmed an unfinished third-part intro at the end.
The run applied 2-frame audio edge fades at cuts to reduce abrupt edges; it did not include a listening check of every splice. The presenter sat off-center in Clips B and C, so Codex adjusted horizontal framing on Short B and Short C and inspected vertical previews. We kept static vertical framing on the presenter across this batch rather than adding digital punch-in zooms; if you want scale changes or subtle whooshes on key lines, ask for them in a separate A-Roll pass after checking the base crop.
Step 4. Apply one word-level caption template across all three Shorts
With the three spoken edits locked, we asked for a single AI caption design across the whole batch:
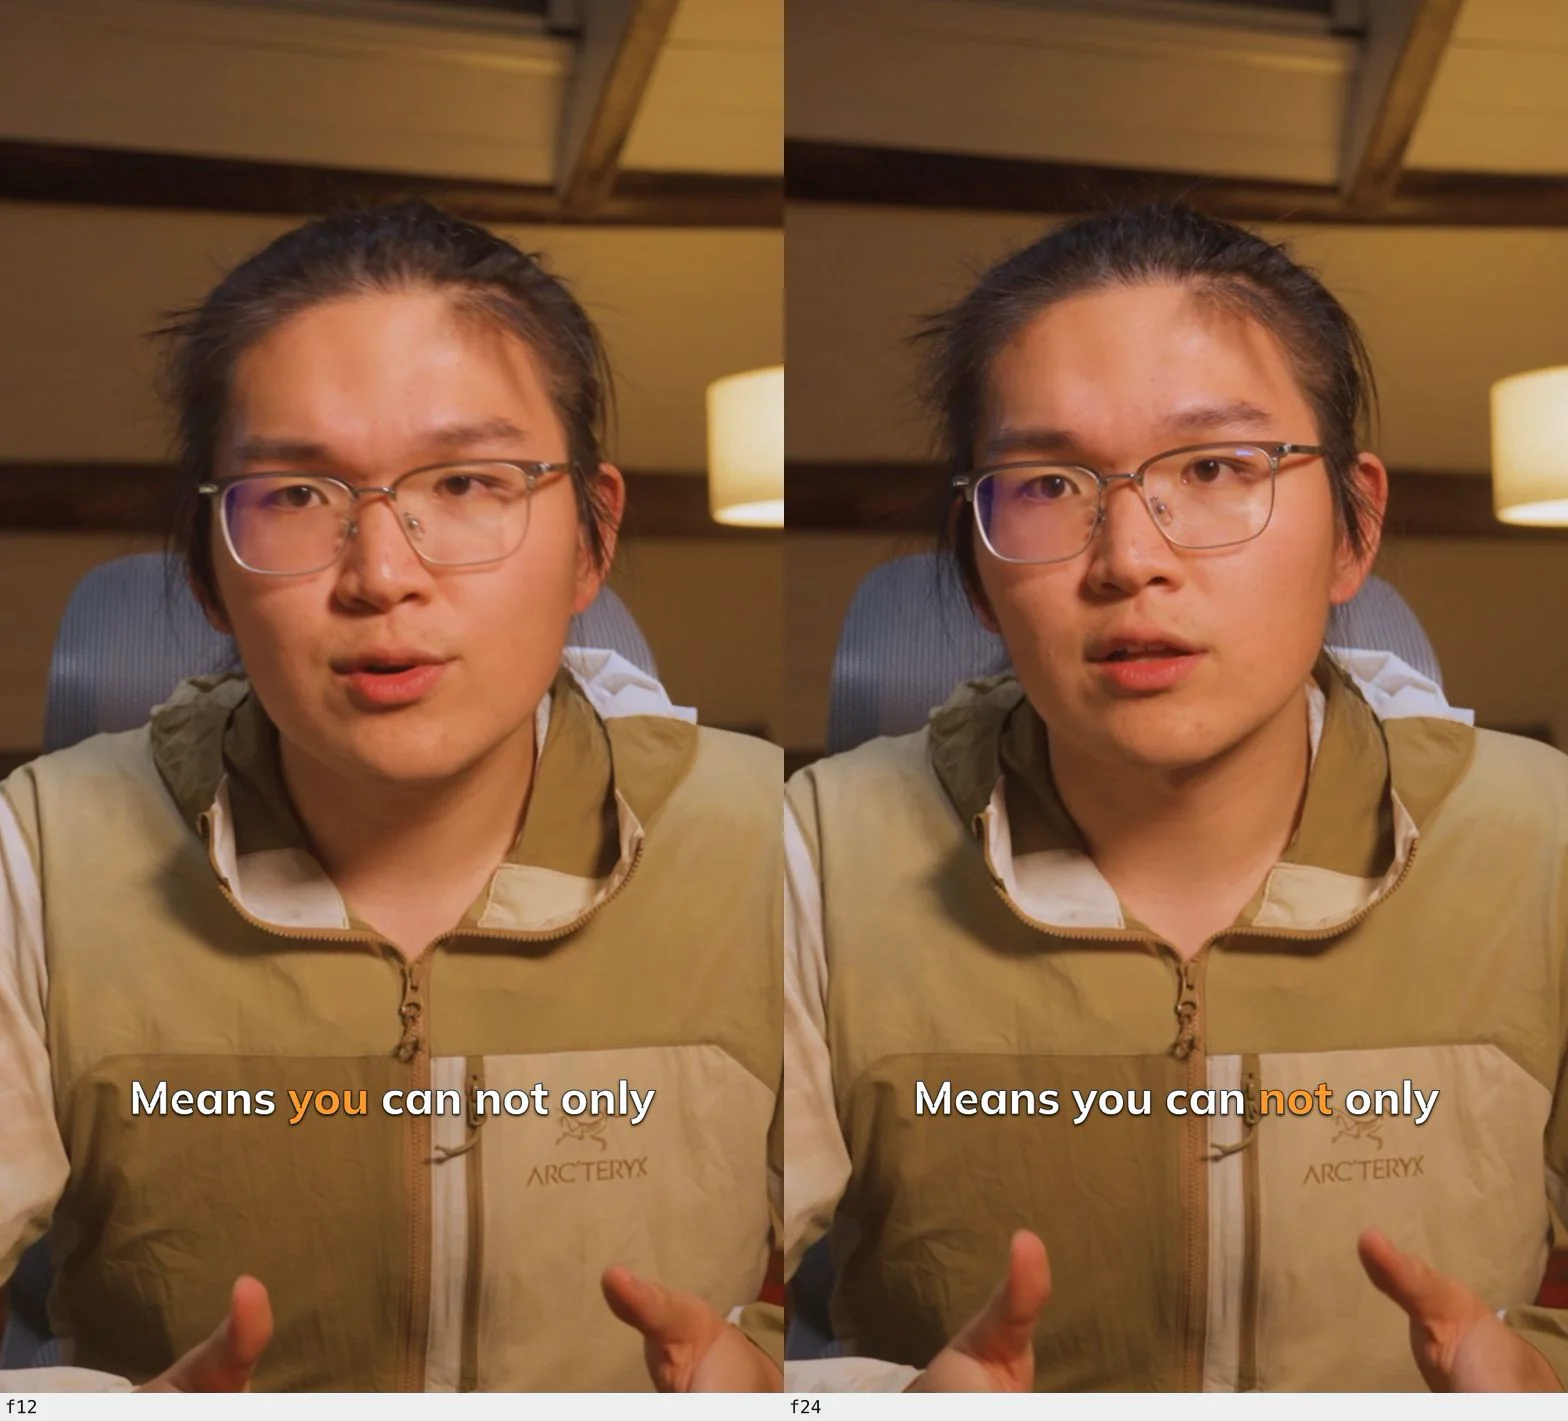
In about 1.5 minutes (0 ChatCut credits), Codex authored one reusable custom caption template—bold white Mulish type, capped at two lines in the lower safe zone, using each word’s exact start and end timestamps so only the word currently being spoken turns orange—and bound that same component to Short A, Short B, and Short C. Before moving on, Codex rendered two sampled frames on Short A (f12 at 0.4s and f24 at 0.8s) to verify that the orange highlight stepped cleanly from “you” to “not” while earlier words returned to white. For accessible captions and why automatic transcription needs review, see the W3C WAI captions guide.
Step 5. Add a shared 2-second title card to each clip
Now the B-Roll packaging pass starts. Instead of building three unrelated intros, we told Codex to summarize each Short’s main thesis inside one shared 2-second Motion Graphics title layout:
In about 0.8 minutes (0 ChatCut credits), Codex shifted the spoken clips and captions forward by 2.0 seconds (60 frames at 30 fps) on all three timelines and placed a matching black title card from 0:00 to 0:02, pairing an orange series label (CODEX × CHATCUT / 01 through 03) with a bold white headline tailored to each clip’s transcript:
Step 6. Quote and generate one AI B-Roll cutaway for Clip B
You rarely need paid AI footage on every clip in a batch. To illustrate a conceptual line in Short B without blowing our 5-credit session cap, we asked Codex to quote the exact AI video generation cost before submitting anything:
Codex checked the preflight price for Seedance 2.5 Flash (4 seconds, 720p, 9:16) and reported an exact estimate of 2.88 ChatCut credits against our 59.22-credit balance. Because 2.88 credits sat comfortably below our 5-credit ceiling, Codex submitted the job, waited for completion without resubmitting, confirmed settlement at 2.88 credits (59.22 → 56.34), and placed the 4-second cutaway over 10.867s–14.867s of Short B (“to the first prompt. Clean up all the filler…”) while keeping the presenter’s voice and orange-highlighted captions on top (about 3.6 minutes end to end).
Two honest details about this shot: its 720×1280 source was scaled into the 1080×1920 timeline (not native 1080p generation), and the laptop screen inside the generated clip shows a generic mock timeline—never pass off AI B-roll as a real product screen recording.
Step 7. Reuse one auto-ducked background music track across the batch
Rather than paying to generate three separate music tracks, we asked Codex to lay one restrained instrumental bed underneath all three timelines and duck it under speech:
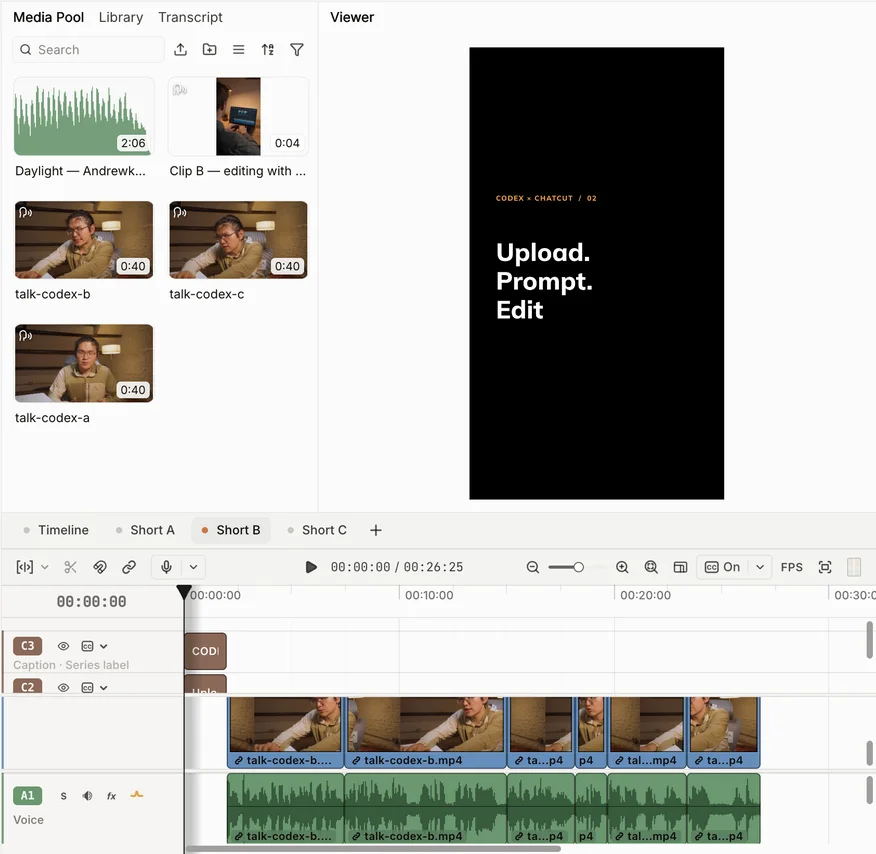
Codex searched ChatCut’s stock audio catalog, downloaded the CC0 instrumental track Daylight by Andrewkn on Freesound once into the project, and placed it on a Music track across Short A, Short B, and Short C at -6 dB base gain with a 1.0-second fade-in, a 1.5-second fade-out, and automatic ducking keyed to the Voice track (about 1.2 minutes, 0 ChatCut credits; if you want a custom-composed stem instead, ChatCut’s AI music generator charges about 0.2 credits per instrumental track).
Because a timeline screenshot only shows track blocks—and in our window capture below, the Music track sits below the vertical scroll fold—Codex also ran an audio mix readout through ChatCut’s export engine on Short C. That check confirmed -19.3 LUFS integrated loudness (-0.7 dBFS peak), with a checked voice segment around -22.3 dBFS RMS and a checked music segment as low as -46.8 dBFS during active speech. These segment measurements do not establish an average for the entire voice track.
Step 8. Batch-export 1080x1920 MP4s and verify every file in the terminal
Finally, we asked Codex to render all three vertical timelines to disk and return a structured edit ledger:
Codex queued local Desktop exports for short-a.mp4, short-b.mp4, and short-c.mp4 as three export jobs (1080×1920, 30 fps, H.264 video, 48 kHz stereo AAC audio) and finished rendering in about 1 minute at 0 ChatCut credits. After export, Codex looped over the three output MP4s in the terminal with ffprobe and ffmpeg to confirm exact stream dimensions, zero decode errors across the full duration of every file, and five evenly spaced check frames (10%, 30%, 50%, 70%, 90%) per Short:
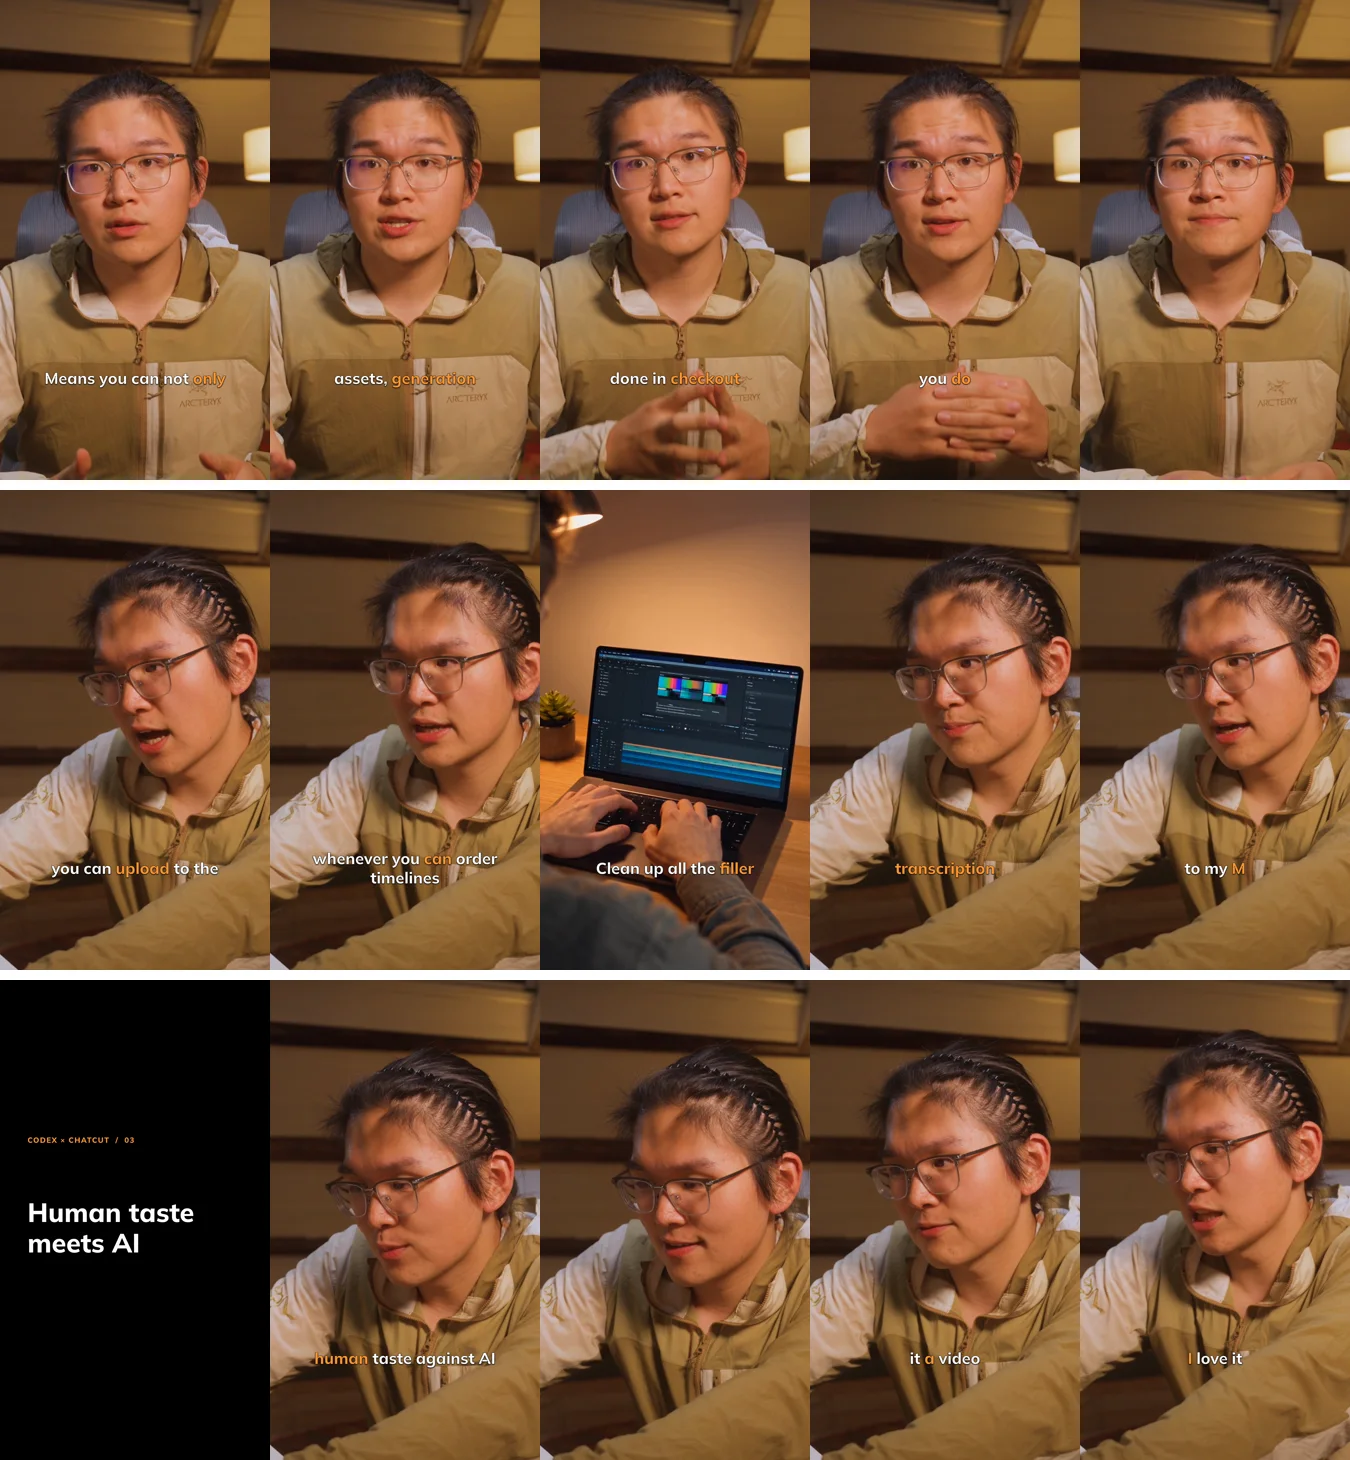
Here is the timing and ChatCut credit ledger for this batch project. Stage times are approximate observation windows that include preparation, adjustments, and screenshots; they are not isolated tool benchmarks. The roughly 13.5-minute wall-clock interval includes gaps between stages. Subsequent export checks and reporting are extra; Codex subscription or API costs were not measured:
| Step | What Codex did across the 3-clip batch | Observed time | ChatCut credits |
|---|---|---|---|
| 1. Connect & create project | Verified existing Desktop connection, created project, checked billing | ~1.0 min | 0.00 |
| 2. Batch import & transcribe | Imported 3 local 16:9 MP4s (120.05s total) and transcribed all three | ~1.3 min | 0.00 |
| 3. Rough cut & 9:16 reframe | Built Short A/B/C (28.0s, 24.8s, 10.5s), fixed B/C horizontal crop | ~2.5 min | 0.00 |
| 4. Shared word captions | Built custom white/orange Mulish template, applied to all 3, checked f12/f24 | ~1.5 min | 0.00 |
| 5. Shared 2s title cards | Shifted speech +2s and added matching black/orange title cards (01–03) | ~0.8 min | 0.00 |
| 6. Clip B AI cutaway | Quoted 2.88 credits, generated 4s 720p Seedance 2.5 Flash shot, placed at 10.9s | ~3.6 min | 2.88 |
| 7. Shared music & ducking | Downloaded CC0 track once, added -6 dB ducked music bed across all 3 | ~1.2 min | 0.00 |
| 8. Batch MP4 export | Rendered three 1080×1920 MP4s locally (69.33s total); later verification excluded | ~1.0 min | 0.00 |
| Batch session total | Connection check through 3 finished local 1080×1920 MP4s | ~13.5 min | 2.88 |
(Which tools did Codex use? It combined ChatCut Desktop’s local editing, transcription, caption, graphics, generation, stock-media, preview, and export tools with terminal checks. See our video editing MCP servers comparison for other integrations.)
Which prompts can you copy for other Codex video editing jobs?
Run codex inside the folder holding your raw recordings so it can pass exact local paths without manual uploads, and keep one editing stage per turn.
Batch talking-head folder cleanup (0 ChatCut credits)
Long interview or podcast to multi-timeline 9:16 Shorts
If you are starting from one 30-minute episode instead of pre-split takes, see our guide to turning long videos into Shorts and use this two-step brief:
Product feature batch with a strict credit cap
What do you still need to check yourself before publishing?
Automated ffprobe checks and sampled frames confirm technical properties, not editorial judgment. The recorded run did not include a full human listening review. Before publishing:
- Proofread captions against the voice. Play each Short with sound on and check names, technical terms, and incomplete sentences. Correct subtitle text without deleting spoken footage unless a cut is intended.
- Check the beginning and ending. Listen for incomplete thoughts and trim unnecessary room tone so the Short ends on a complete point.
- Inspect each 9:16 crop. Check the speaker’s face throughout the edit, especially when their posture changes. Ask Codex for rendered preview frames and review the result in the Viewer.
- Distinguish generated B-roll from screen recordings. The laptop screen in this run is synthetic, generic UI. Use real recordings for an actual product demonstration and follow YouTube’s synthetic content disclosure policy where applicable.
- Listen across splices and ducked music. The recorded mix analysis supports ducking on Short C; its integrated loudness alone does not prove it. Listen to all three Shorts to judge speech clarity, breaths, and music levels.
How do you troubleshoot Codex and ChatCut Desktop?
ChatCut tools do not appear in Codex after installation
Codex loads MCP servers and bundled skills when a session starts (OpenAI Plugins docs). If you just ran Read ChatCut.io/desktop to install ChatCut, exit and reopen codex in your terminal (a cleared screen alone does not reload MCP servers) or open a brand-new chat in the ChatGPT desktop app. If tools are still missing, check two things: confirm you completed sign-in inside the ChatCut Desktop window, and run codex mcp list (or type /mcp inside Codex CLI) to verify the local server is registered in ~/.codex/config.toml. Do not use the Codex IDE extension to browse plugins—OpenAI’s plugin directory runs in the ChatGPT desktop app and Codex CLI, though standalone local MCP servers configured in config.toml are shared.
A paid B-roll generation takes a couple of minutes
In this recorded run, the B-roll stage took about 3.6 minutes including generation, checking, and placement. If Codex stops waiting before a job finishes, ask it to check that existing job; requesting a new generation can create another charge. Ask Codex to check the status of the existing job and place that asset once settled. Verify any completed deduction under Avatar menu → Credits history → Detail in ChatCut Desktop (Credits policy).
Codex created and edited a project, but no ChatCut window popped up
By design, creating or targeting a local .chatcutproject from an external agent leaves its window closed so batch work does not steal focus (Edit a Desktop Project from Your Agent). Launch ChatCut Desktop anytime and open the project from Projects (or ask Codex to open the project window) to play and fine-tune the timelines visually.
You want to finish color or audio in Premiere Pro or DaVinci Resolve
Alongside local video export (up to 4K, plus HDR on macOS), ChatCut Desktop exports FCP7 XML (XMEML) for Adobe Premiere Pro and DaVinci Resolve, plus editable CapCut or Jianying drafts when installed locally (Product Facts). Final Cut Pro FCPXML is not supported, and captions, transitions, and unrendered motion graphics do not carry over in XML—render transparent ProRes 4444 motion-graphics overlays (paid plans) if you need them in an external NLE.
Using a different agent? The same ChatCut edit works from ChatGPT, Claude Code, Cursor, Antigravity, Grok Bot, OpenClaw, Hermes Agent, Meta Muse and WorkBuddy; each guide covers that agent’s install and quirks.